Return to opportunities you have saved
Video sections for this page
Video sections for this page
- 0:00 — Open My Projects Folder
- 0:13 — Compare the three saved-work sections
- 0:40 — Read the saved stock-number row
- 1:08 — Open the matching project folder
- 1:30 — Read the project file pane
- 1:55 — Review the upload dialog controls
- 2:23 — Open Notes and return to the folder list
- 2:42 — Return to My Projects Folder
Application path: Main Menu → My Projects Folder.
This page brings saved work together in three sections. Choose the appropriate section for the kind of record you saved:
| Section | What its rows display |
|---|---|
| Parts By NSN | The NSN, item description, technical-data link, AMC, solicitation number, dates, source, set-aside, quantity, estimated value and Folder link. |
| Federal, State and Local | The opportunity subject, agency, opening and closing dates, set-aside and Folder link. View Solicitation opens its notice. |
| Expiring Contracts | Contract number, modification, reference number, subject, award date, estimated completion date, set-aside and Folder link. |
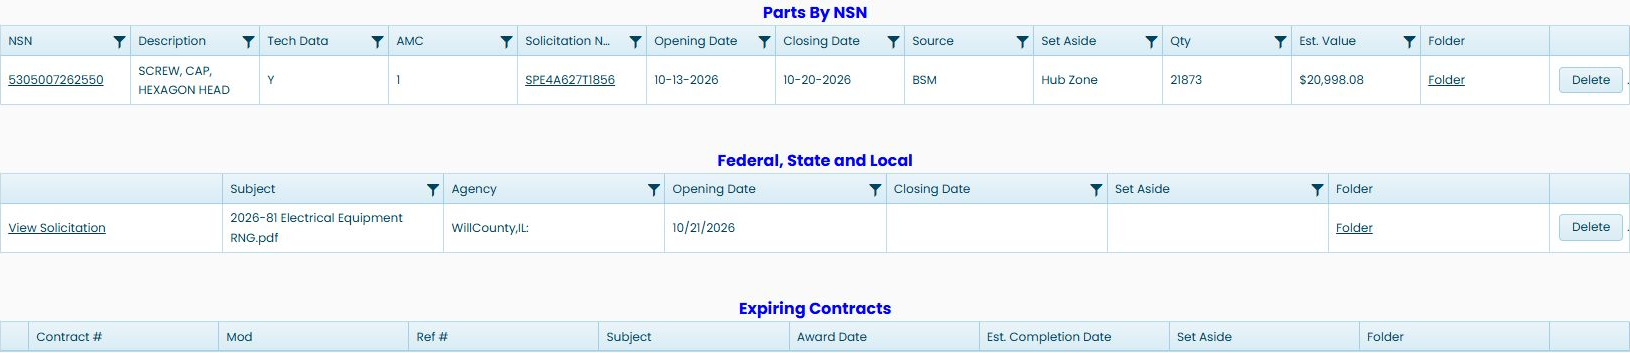
The example contains 2026-81 Electrical Equipment RNG.pdf from WillCounty,IL: in Federal, State and Local. View Solicitation returns to the notice. Folder is the entry to that saved opportunity's folder. Its row also has Delete.
Use the headings to keep the different kinds of work straight. A saved state/local notice belongs in the middle section, while a saved stock-item opportunity appears under Parts By NSN. Expiring Contracts is empty in this example. The parts and notice sections also display column-filter icons.
In Federal, State and Local, Subject is the saved notice title and Agency is the buyer or publisher shown with it. Opening Date and Closing Date are the saved notice dates; check the original notice for a current response deadline. Set Aside is the recorded participation category when supplied. The illustrated row has blank Closing Date and Set Aside cells, so it does not give a deadline or eligibility category there. Use View Solicitation for the notice and Folder for its working files; those links serve different purposes.
In Expiring Contracts, Contract # identifies the recorded contract, Mod its action or modification, and Ref # a related reference identifier when shown. Subject summarizes the prior work. Award Date is the date of the recorded action, while Est. Completion Date is its expected completion date; neither is a new solicitation deadline. Set Aside is the category recorded for that historical action. Folder opens its saved project files. This section has no rows in the illustrated SalesHelp example, so the headings are explained here without assigning example values.
Open a saved Federal, State and Local project
For 2026-81 Electrical Equipment RNG.pdf, choose Folder in the Federal, State and Local row. The project window opens under Opportunities with a folder name identifying the electrical-equipment notice. Its file pane uses Filename, Size and Creation Date, and this project shows 14 standard folders. Unlike the Parts By NSN example below, this folder does not show FLIS data. Close the project window to return to My Projects Folder; the saved notice remains in its row. The current example's Expiring Contracts section is empty, so it has no folder row to open.
Save an NSN opportunity and find it again
From Unfulfilled Opportunities, open NSN 5305007262550, then choose Create Folder for solicitation SPE4A627T1856. The folder window opens for that solicitation and NSN. Return to Main Menu → My Projects Folder to find the same opportunity under Parts By NSN.
In this example, that saved row shows SCREW, CAP, HEXAGON HEAD, quantity 21,873, estimated value $20,998.08, and closing date October 20, 2026. Opening Date is the date displayed for the notice; Closing Date is its listed deadline. Tech Data shows Y and AMC shows 1 for this row; these are recorded indicators, not instructions about the current solicitation. Source shows BSM, and Set Aside shows Hub Zone. Read those fields as displayed and check the linked notice for current requirements. Qty is the listed item quantity, and Est. Value is an estimate rather than a quoted price.
The linked NSN opens its solicitation summary; the linked Solicitation N. opens the DLA notice. Selecting Folder on this row opened a separate project window with the matching solicitation and NSN in its tree and the standard document folders in the file pane. Saving the row does not change the notice's closing date. The row also has a Delete button.
Save a notice from Just My Opportunities and add a working note
In Just My Opportunities, find Maintenance, Repair, and Preservation of YRBM-50, solicitation N4523A26R1002, and choose its Create Folder link. In the folder form, choose Add Folder. The project explorer opens for the saved notice.
- Double-click Notes to open the project's working-notes folder.
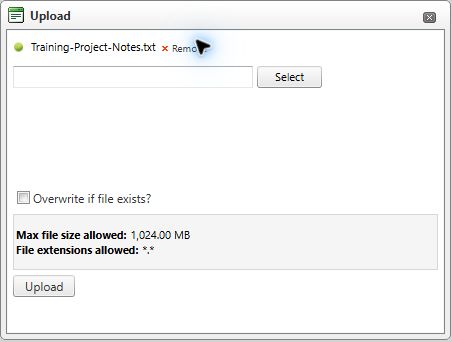
- Choose Upload, then Select. In this example, select Training-Project-Notes.txt, a small training note.
- Leave Overwrite if file exists? unchecked and choose Upload.
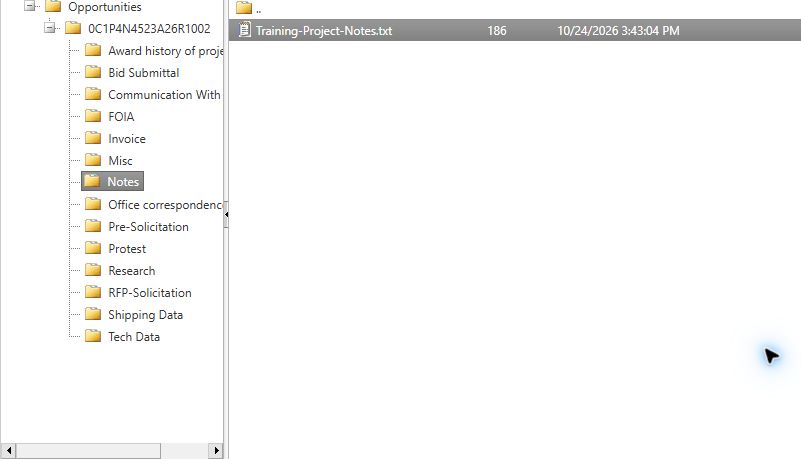
- Check the file pane. The completed example shows Training-Project-Notes.txt with a size of 186 bytes in Notes.
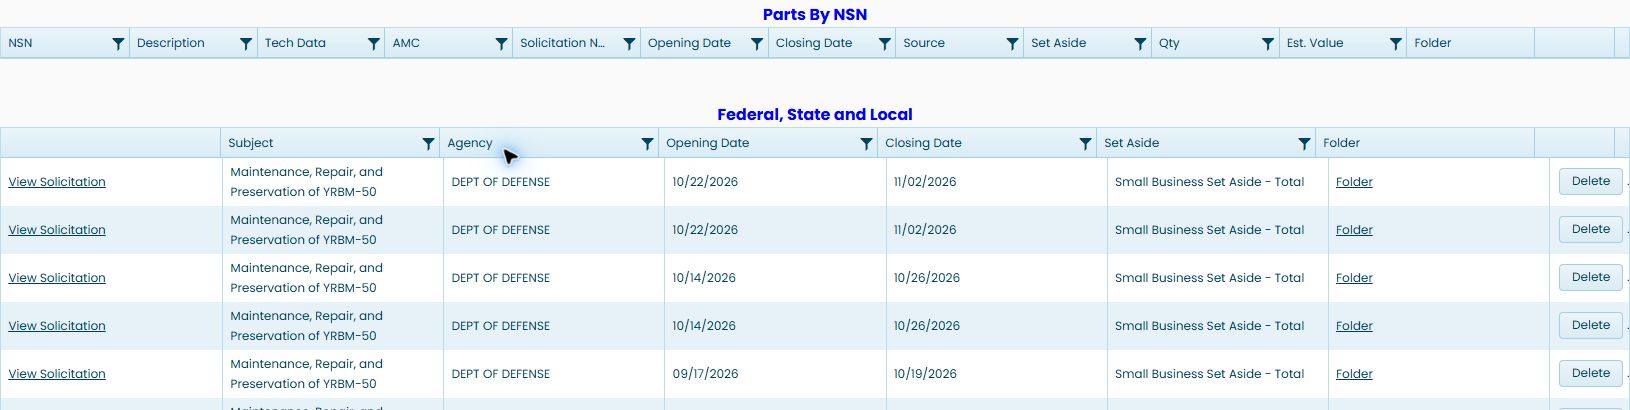
Return to Main Menu → My Projects Folder. Find the notice in Federal, State and Local and use its Folder link to return to the project's files. The example includes multiple notice rows associated with the same solicitation; use the notice subject as well as the solicitation number to identify the intended entry.
Remove the saved notice and reopen its existing project
For the YRBM-50 training example, choose Delete on its Federal, State and Local row, then confirm OK. All 10 notice rows associated with N4523A26R1002 disappear from this section; the three unrelated HEPA notice rows remain. Check the refreshed list after confirming, rather than assuming that only the single row you clicked will disappear.
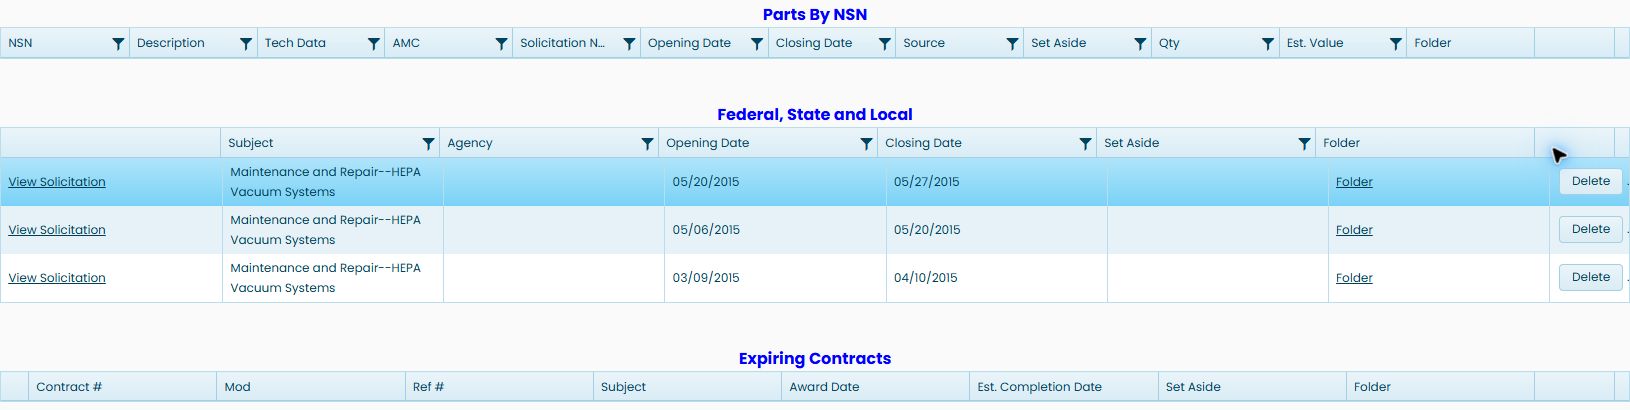
Reopening the same notice's Create Folder link returns directly to its existing project explorer in this example, without another Add Folder prompt. Open Notes: Training-Project-Notes.txt remains 186 bytes, with its original creation timestamp. Returning to My Projects Folder shows the ten YRBM-50 notice rows again.
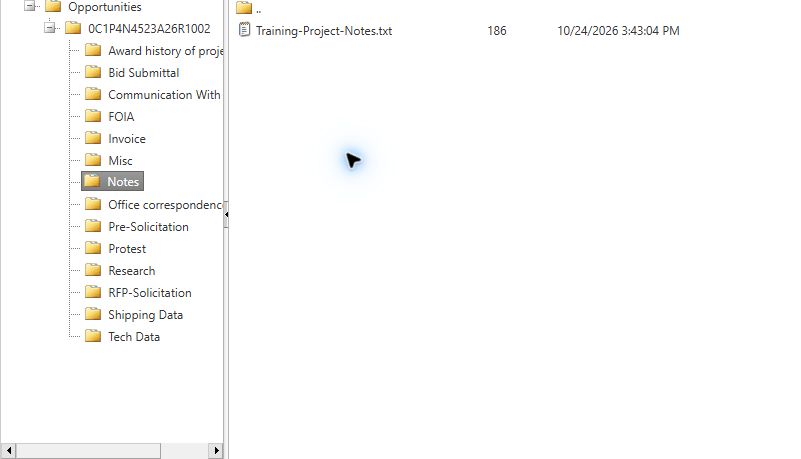
Removing these saved notice rows did not delete the uploaded document. Removing a row from this list and deleting a file inside the project are different actions. This example demonstrates the Federal, State and Local notice route and its return to the retained files. The same confirmation and saved-entry removal steps apply to the other sections; their scope is explained below.
Understand the folder window
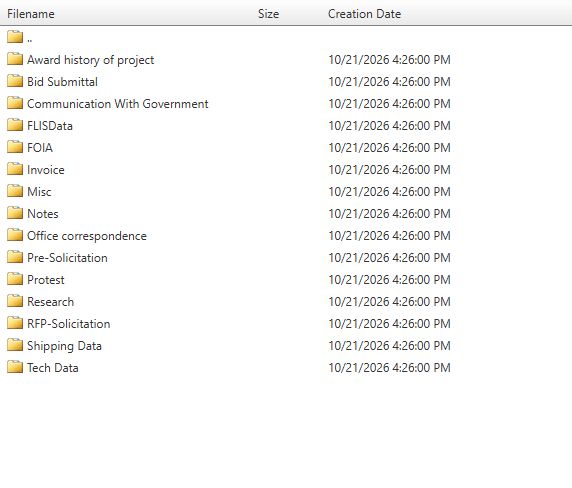
The left tree places the project under Opportunities, with its solicitation number and NSN identifying it. The project contains folders for the award history, bid submittal, government communications, FLIS data, FOIA, invoices, miscellaneous files, notes, office correspondence, pre-solicitation work, protests, research, the RFP/solicitation, shipping data and technical data.
The file pane has Filename, Size and Creation Date columns. These describe the stored files and folders rather than the opportunity's procurement dates.
Choose a file for the project
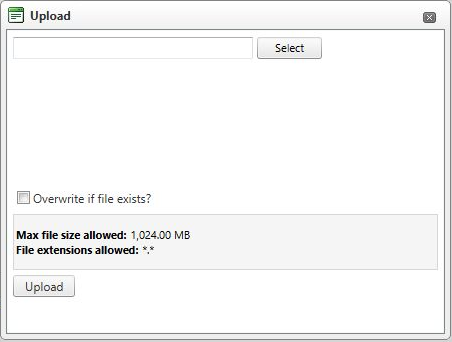
The project window has an Upload control. It opens a dialog with Select, an Overwrite if file exists? checkbox, Upload, and a close control. Use Select to choose the file for the current project folder. The overwrite checkbox starts unchecked; review it if a file with the same name may already be present. The dialog displays a maximum file size of 1,024.00 MB and *.* under File extensions allowed. Read those limits in the dialog before choosing a file.
To add a document to the appropriate part of a project:
- Open the saved opportunity's Folder, then open the destination folder—for example, Bid Submittal for your response documents or Notes for working notes. Check the selected folder in the left tree.
- Choose Upload, then Select, and choose the document. Selecting a file prepares it for upload; it is not the final upload step.
- Keep Overwrite if file exists? unchecked to avoid intentionally replacing an existing file. Select it only when you mean to replace the same-named file in that destination.
- Choose Upload. Wait for the dialog's result before closing it. If it reports a problem, resolve that problem rather than assuming the document was saved.
- Return to the file pane and check that the expected filename appears in the intended folder. Use Filename, Size and Creation Date to identify it. Close the dialog without uploading if you decide not to add the document.
Open a project subfolder and return
The file pane lists the project's standard folders. Filename identifies each folder or file, Size is the file size when displayed, and Creation Date is when that entry was created—not the solicitation's opening or closing date.
Double-click Notes in the file pane to open that folder. In this example it is empty: the pane contains only .., the parent-folder entry. The left tree highlights Notes, showing which part of the project you are viewing.
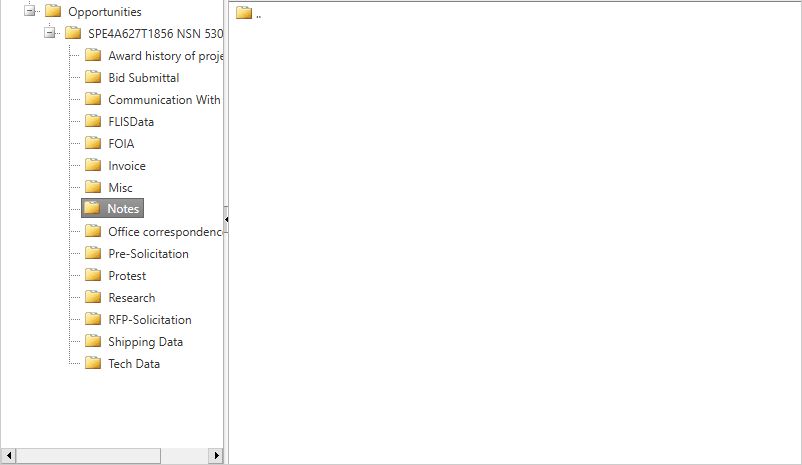
Double-click .. to return to the project's folder list. The standard folders, including Notes, appear again. Close the separate project window to return to My Projects Folder; the saved NSN row remains on that page.
Remove a row from My Projects Folder
Each saved-work section has a Delete button on its rows. First identify the correct opportunity by its NSN and solicitation number, notice subject, or contract number. Delete is separate from opening the Folder or the original notice.
- Choose Delete on the intended row.
- Read Are you sure you want to delete this item?
- Choose Cancel to keep the item. Confirm only when you intend to remove that saved item.
- After confirming, check the refreshed section to establish whether the row was removed. Do not assume success if the row remains or an error appears.
In Parts By NSN, identify both the NSN and solicitation number before confirming. In Expiring Contracts, identify the contract: removing its saved entry concerns the saved contract, not just one modification or action. These list controls remove the saved entry and leave uploaded project files in place. The illustrated return to the saved project is the Federal, State and Local example above.
Deleting a selected file inside the project explorer is a separate action. Likewise, uploading with Overwrite if file exists? selected replaces a same-named file. Do not confuse either file operation with removing a saved entry from this page.